Upgrading the delete confirmation button
by Andy
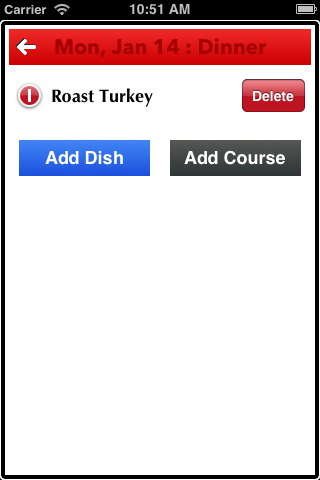 iOS has a nice pattern for deleting a row in a table, either tap a minus symbol in a red circle or swipe your finger along the row and a delete button slides in from the right, tap the button to confirm the action or tap elsewhere to cancel. The only problem is that if you have a different look and style than the default then the delete button looks out of place.
I encountered this recently and decided to see if I could replace the delete button with one more in keeping with the rest of the graphic style in my MealSchedule app.
Searching for examples of what other people might have done led to a couple of general approaches. The first was to subclass UITableViewCell to get the ability to override the willTransitionToState: method that is invoked as a cell moves through various editing states, and the second was to walk through the view hierarchy of the newly animated delete button and modify it. There’s nothing wrong with first suggestion because it utilizes a standard API, but the second involves testing against internal class names and assuming a particular view hierarchy, neither of which have any place in any app, regardless of whether you are submitting it to the AppStore or not. Working against an API or utilizing ordinarily hidden features is a bad smell and a strong indication that you are doing something wrong.
So the first step to having a nice delete confirmation button is to subclass UITableViewCell and override willTransitionToState:. The method is called with a bit mask of the new states. We are interested in the situation where the delete confirmation button is about to be displayed.
| - (void)willTransitionToState:(UITableViewCellStateMask)state { | |
| if ((state & UITableViewCellStateShowingDeleteConfirmationMask) == UITableViewCellStateShowingDeleteConfirmationMask) { | |
| } else { | |
| [super willTransitionToState:state]; | |
| } | |
| } |
The default transition will create the shiny delete button and animate it into place. We don’t want to do that because we want to create our own button, but we will leave the other transitions to their default for the time being, so we are careful as to when we invoke super.
The next step is to create the new button and animate it into place. MealSchedule has a UIButton subclass named MPButton that encapsulates my alternative presentation, so let’s extend the transition to include that.
| - (void)willTransitionToState:(UITableViewCellStateMask)state { | |
| CGRect f; | |
| if ((state & UITableViewCellStateShowingDeleteConfirmationMask) == UITableViewCellStateShowingDeleteConfirmationMask) { | |
| if (!_deleteButton) { | |
| _deleteButton = [MPButton buttonWithType:MPButtonTypeAlert withTitle:NSLocalizedString(@"Delete",@"Delete")]; | |
| [[_deleteButton titleLabel] setFont:[[UIFont buttonFont] changeFontSizeBy:-2]]; | |
| [_deleteButton addTarget:self action:@selector(delete:) forControlEvents:UIControlEventTouchUpInside]; | |
| [self addSubview:_deleteButton]; | |
| } | |
| f = RBRectCenterPositionY([_deleteButton frame], CGRectGetHeight([self frame])); | |
| f.origin.x = CGRectGetWidth([self frame]); | |
| [_deleteButton setFrame:f]; | |
| f.origin.x = CGRectGetMaxX([self frame]) - [UIScreen tableContentPadding] - f.size.width; | |
| _isDeleting = NO; | |
| } else { | |
| [super willTransitionToState:state]; | |
| if (_deleteButton) { | |
| f = [_deleteButton frame]; | |
| if (_isDeleting) { | |
| alpha = 0.0f; | |
| } else { | |
| f.origin.x = CGRectGetWidth([self frame]); | |
| } | |
| } | |
| } | |
| if (_deleteButton) { | |
| [UIView animateWithDuration:0.3f | |
| animations:^{ | |
| [_deleteButton setFrame:f]; | |
| [_deleteButton setAlpha:alpha]; | |
| }]; | |
| } | |
| } |
I use an instance variable to hold a reference to the delete button. I don’t strictly need to do this – I could use a tag and viewWithTag: instead, but the default implementation of the delete confirmation button uses tags within its hierarchy and so keeping a reference is safer than a tag by avoiding any unintended side effects from the base classes looking for views. The RBRectCenterPositionY is a simple function I use to center a CGRect within a particular height. I also use a category on UIScreen to return various numbers, such as the standard 10 pixels that are added as padding to a table’s content.
Note that when the cell transitions out of the delete confirmation state we want to make sure the delete button is moved out of the way, though if the cell is being deleted (as flagged by the _isDeleting variable) when just fade the button to invisible rather than move it to the right. This works as a smoother effect during the actual delete, which we will see in a minute, but for now you can tap the red minus to animate the delete button in, and tap it again to animate the button away.
The button is worthless unless we can actually perform a delete so we need to provide a method for the action we specified in the button creation.
| - (void)delete:(id)sender { | |
| _isDeleting = YES; | |
| [self commitEdit:UITableViewCellEditingStyleDelete]; | |
| } | |
| - (void)commitEdit:(UITableViewCellEditingStyle)editStyle { | |
| [self willTransitionToState:UITableViewCellStateShowingEditControlMask]; | |
| if ([[_table dataSource] respondsToSelector:@selector(tableView:commitEditingStyle:forRowAtIndexPath:)]) { | |
| NSIndexPath *ip = [_table indexPathForRowAtPoint:[self center]]; | |
| [[_table dataSource] tableView:_table commitEditingStyle:editStyle forRowAtIndexPath:ip]; | |
| } | |
| [self didTransitionToState:UITableViewCellStateShowingEditControlMask]; | |
| } |
When the delete button is tapped, it will invoke the delete: method that in turn invokes another local method named commitEdit:. As my button is a complete replacement for the standard button then we need to invoke the same transitions that would normally occur. In this particular situation, my table is always in edit mode so we will always be transitioning back to the UITableViewCellStateShowingEditControlMask state.
The table’s datasource is the class that handles the delete so we need to invoke the standard tableView:commitEditingStyle:forRowAtIndexPath: method. The only slight problem here is that we need to know our current index path, and that is not available to us from the perspective of our UITableViewCell world. Unfortunately neither is the knowledge of the containing table. The table is actually a piece of private information in the base UITableViewCell class, but is not exposed to subclasses. Therefore we need to create a property, named table here, to pass in the table reference when we create an instance of our cell. Note that you cannot call this property tableView because that will conflict with the private reference!
The final step is to handle the cancelation of the delete by tapping elsewhere in the table. The easiest way of doing that is to set up a UITapGestureRecognizer on the table.
| - (void)willTransitionToState:(UITableViewCellStateMask)state { | |
| if ((state & UITableViewCellStateShowingDeleteConfirmationMask) == UITableViewCellStateShowingDeleteConfirmationMask) { | |
| // ... | |
| _showingConfirmation = YES; | |
| _cancelDeleteGesture = [[UITapGestureRecognizer alloc] initWithTarget:self action:@selector(deleteConfirmation:)]; | |
| [_table addGestureRecognizer:_cancelDeleteGesture]; | |
| } else { | |
| // ... | |
| } | |
| // ... | |
| } | |
| - (void)didTransitionToState:(UITableViewCellStateMask)state { | |
| if (_showingConfirmation) { | |
| if ((state & UITableViewCellStateShowingDeleteConfirmationMask) != UITableViewCellStateShowingDeleteConfirmationMask) { | |
| _showingConfirmation = NO; | |
| if (_cancelDeleteGesture) { | |
| [_table removeGestureRecognizer:_cancelDeleteGesture]; | |
| _cancelDeleteGesture = nil; | |
| } | |
| } | |
| } | |
| [super didTransitionToState:state]; | |
| } | |
| // In iOS5 the tap gesture is fired before the touch on the delete button, even though the highlight happens | |
| // In iOS6 the touch on the button fires before the tap gesture | |
| - (void)deleteConfirmation:(UITapGestureRecognizer *)sender { | |
| if ([sender state] == UIGestureRecognizerStateEnded) { | |
| UITableViewCellEditingStyle editStyle = UITableViewCellEditingStyleNone; | |
| // Determine if we actually tapped on the delete button | |
| CGPoint curLocation = [sender locationInView:self]; | |
| if (CGRectContainsPoint([_deleteButton frame], curLocation)) { | |
| _isDeleting = YES; | |
| editStyle = UITableViewCellEditingStyleDelete; | |
| } | |
| [self commitEdit:editStyle]; | |
| } | |
| } | |
The gesture recognizer is created when we transition into the delete confirmation state, and removed when we have transition out of the confirmation.
One small wrinkle that I discovered here was a difference between iOS5 and iOS6. In the later SDK, the tap on the delete button will override that of the tap gesture, meaning the delete: method is invoked directly, but on iOS5 (and possibly earlier but I am not targeting those platforms so I didn’t test them), the tap gesture fires and the button’s action does not. Hence the deleteConfirmation: method tests to see if the tap was actually over the delete button or not.
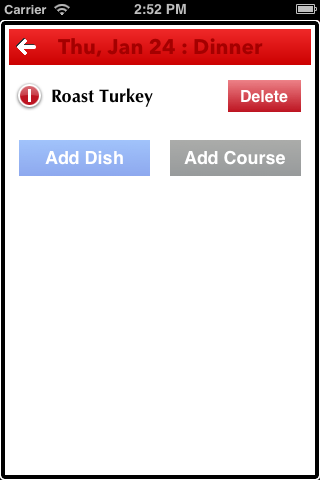 Now I have a nice delete confirmation button that matches all the other buttons in the app, and has been implemented without the knowledge or use of internal classes or views. In addition to the code above, I added a couple of custom methods on my table delegate to dim the other visible controls to avoid any confusion over the delete action, but that is just a little detail in my particular implementation.
I also decided to leave the red minus as is because it doesn’t look as out of place as much as the confirmation button. The only functionality I have not replicated from the default delete confirmation process is animating the red minus back to horizontal if the delete is cancelled. To be able to perform that animation with the standard button would require referencing the internal representation. Alternatively I could replace the button, which I might do if the lack of animation starts to bug me.

I’m from space. And I’m just passing by to say Thank You! Great job with this article.
I see a lot of interesting articles on your blog.
You have to spend a lot of time writing, i know how to save you a lot of time, there is a tool that
creates unique, SEO friendly articles in couple of
seconds, just search in google – laranita’s free content source
I read a lot of interesting articles here. Probably you
spend a lot of time writing, i know how to save you a lot of time, there is an online tool that creates high quality, SEO friendly
articles in minutes, just type in google – laranitas free
content source
Hello blogger, i must say you have high quality
content here. Your website should go viral. You
need initial traffic boost only. How to get it? Search for; Mertiso’s tips go viral